- En contenedor debian 10
- La base de datos esta en otro servidor ya configurado
Instalar mysql
- Ingresamos a tmp
cd /tmp/- Descargamos el paquete
wget http://repo.mysql.com/mysql-apt-config_0.8.13-1_all.deb- Descargamos la dependencia GNUPG
apt install gnupg -y- Instalamos
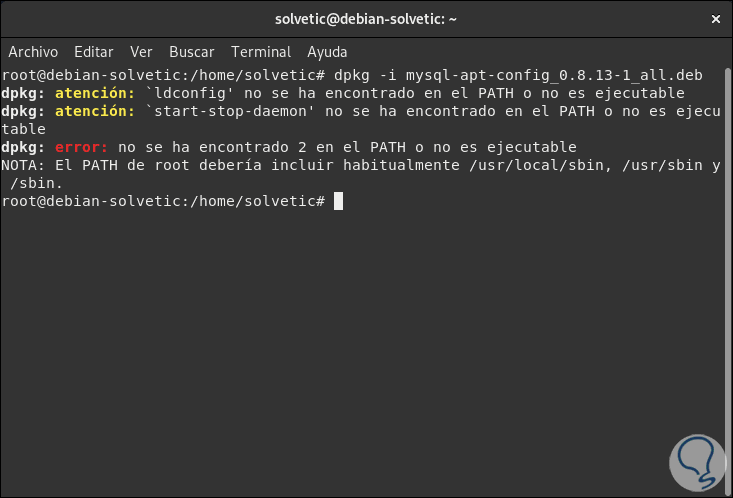
dpkg -i mysql-apt-config_0.8.13-1_all.deb- Si no da el siguiente error

- Abrimos
nano /etc/profile- Aquí encontramos esto
if [ "`id -u`" -eq 0 ]; then
  PATH="/usr/local/sbin:/usr/local/bin:/usr/sbin:/usr/bin:/sbin:/bin"
else
  PATH="/usr/local/bin:/usr/bin:/bin:/usr/local/games:/usr/games"
fi- Vamos a modificar el segundo path así
PATH="/usr/local/sbin:/usr/local/bin:/usr/sbin:/usr/bin:/sbin:/bin:/usr/local/games:/usr/games"- Guardamos salimos de la sesion y volvemos a ejecutar la sentencia
dpkg -i mysql-apt-config_0.8.13-1_all.deb
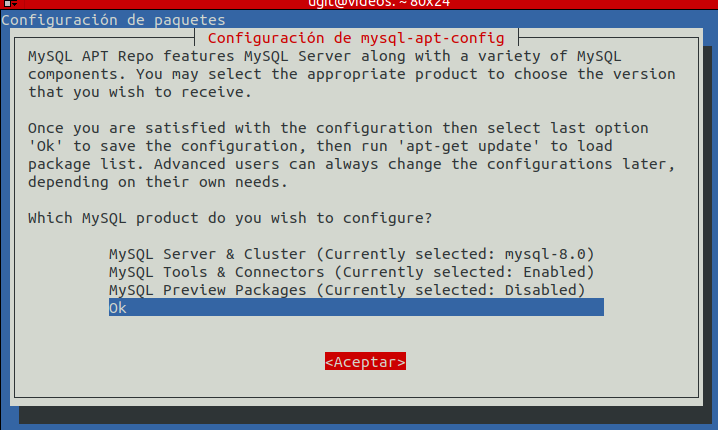
- Instalamos Server & Cluster

- Seleccionamos la versión

- Damos Aceptar

- Mandamos a instalar
apt install default-mysql-server -y- Mandamos a configurar
mysql_secure_installation- RESULTADO:
NOTE: RUNNING ALL PARTS OF THIS SCRIPT IS RECOMMENDED FOR ALL MariaDB
      SERVERS IN PRODUCTION USE!  PLEASE READ EACH STEP CAREFULLY!

In order to log into MariaDB to secure it, we'll need the current
password for the root user.  If you've just installed MariaDB, and
you haven't set the root password yet, the password will be blank,
so you should just press enter here.

Enter current password for root (enter for none):
OK, successfully used password, moving on...

Setting the root password ensures that nobody can log into the MariaDB
root user without the proper authorisation.

Set root password? [Y/n] Y
New password:
Re-enter new password:
Password updated successfully!
Reloading privilege tables..
 ... Success!

By default, a MariaDB installation has an anonymous user, allowing anyone
to log into MariaDB without having to have a user account created for
them.  This is intended only for testing, and to make the installation
go a bit smoother.  You should remove them before moving into a
production environment.

Remove anonymous users? [Y/n]
 ... Success!

Normally, root should only be allowed to connect from 'localhost'.  This
ensures that someone cannot guess at the root password from the network.

Disallow root login remotely? [Y/n]
 ... Success!

By default, MariaDB comes with a database named 'test' that anyone can
access.  This is also intended only for testing, and should be removed
before moving into a production environment.

Remove test database and access to it? [Y/n]
 - Dropping test database...
 ... Success!
 - Removing privileges on test database...
 ... Success!

Reloading the privilege tables will ensure that all changes made so far
will take effect immediately.

Reload privilege tables now? [Y/n]
 ... Success!

Cleaning up...

All done!  If you've completed all of the above steps, your MariaDB
installation should now be secure.

Thanks for using MariaDB!
Instalar Apache PHP
- Instalamos la dependencias
apt-get install apache2 php libapache2-mod-php php-mysql php-curl php-gd php-intl ffmpeg git libimage-exiftool-perl acl -y- Configuramos apache2 abrimos
nano /etc/apache2/apache2.conf- Remplazamos
<Directory /var/www/>
        Options Indexes FollowSymLinks
        AllowOverride None
        Require all granted
</Directory>
/*************************** X ESTE ***********************/
<Directory /var/www/>
        Options Indexes FollowSymLinks
        AllowOverride All
        Require all granted
</Directory>- Abrimos
nano /etc/apache2/conf-available/charset.conf- Descomentamos
#AddDefaultCharset UTF-8
X
AddDefaultCharset UTF-8- Configuramos las paginas de error
nano /etc/apache2/conf-available/localized-error-pages.conf - Agregamos
ErrorDocument 403 https://403.siua.ac.cr
ErrorDocument 404 https://404.siua.ac.cr
ErrorDocument 500 https://500.siua.ac.cr- Configuramos la seguridad
nano /etc/apache2/conf-available/security.conf- Modificamos
ServerTokens OS
X
ServerTokens Prod
/**********************************/
ServerSignature On
X
ServerSignature Off- Configuramos PHP
- Abrimos
nano /etc/php/7.3/apache2/php.ini- Remplazamos
post_max_size = 8M
X
post_max_size = 1000M
/***********************************/
max_execution_time = 30
X
max_execution_time = 7200
/***********************************/
upload_max_filesize = 2M
X
upload_max_filesize = 1000M
/***********************************/
memory_limit = 128M
X
memory_limit = 512M- Reinicamos
service apache2 restartPermisos de carpeta y usuario «ugit»
- Lo primero que vamos hacer es añadir al usuario «ugit» al grupo «www-data», para que podamos modificar los datos con el usuario ugit
usermod -a -G www-data ugit- Ahora establecemos que todo los que este en /var/www/html pertenezca al grupo www-data
chgrp -R www-data /var/www/html- Ahora le damos permisos para que los usuarios del grupo «www-data» puedan escribir
chmod -R g+w /var/www/html- Ahora le damos permisos a los directorios y archivos de (lectura, escritura y ejecución para usuario y grupo 7 lectura y ejecución para el resto)
find /var/www/html -type d -exec chmod 2775 {} \;
find /var/www/html -type f -exec chmod ug+rw {} \;- Ahora asignamos el «sticky bit» para el grupo (para que los archivos y directorios que se creen arrastren la propiedad del grupo www-data)
chmod g+s /var/www/html/- Asigna los permisos por defecto (para que los directorios que se creen arrastren los mismos permisos)
setfacl -d -m g::rwx /var/www/html/- Deshabilitamos
a2dissite 000-default.conf - Instalamos modulos
a2enmod ssl
a2enmod headers
a2enmod rewrite
a2enmod expires- Creamos un archivo de configuración para el módulo expires
nano /etc/apache2/mods-available/expires.conf- Le agregamos lo siguiente
<IfModule mod_expires.c>
          ExpiresActive on
          ExpiresByType image/jpg "access plus 60 days"
          ExpiresByType image/png "access plus 60 days"
          ExpiresByType image/gif "access plus 60 days"
          ExpiresByType image/jpeg "access plus 60 days"
          ExpiresByType text/css "access plus 1 days"
          ExpiresByType image/x-icon "access plus 1 month"
          ExpiresByType application/pdf "access plus 1 month"
          ExpiresByType audio/x-wav "access plus 1 month"
          ExpiresByType audio/mpeg "access plus 1 month"
          ExpiresByType video/mpeg "access plus 1 month"
          ExpiresByType video/mp4 "access plus 1 month"
          ExpiresByType video/quicktime "access plus 1 month"
          ExpiresByType video/x-ms-wmv "access plus 1 month"
          ExpiresByType application/x-shockwave-flash "access 1 month"
          ExpiresByType text/javascript "access plus 1 days"
          ExpiresByType application/x-javascript "access plus 1 dyas
          ExpiresByType application/javascript "access plus 1 days"
</IfModule>- Una vez creado le creamos un enlace simbólico dentro de mods-enabled para habilitarlo
ln -s /etc/apache2/mods-available/expires.conf /etc/apache2/mods-enabled/- Habilitamos modulo defalte
a2enmod deflate - Abrimos donde le decimos que comprima todo excepto imágenes, archivos ya comprimidos y pdf’s
nano /etc/apache2/mods-available/deflate.conf- Agregamos
SetOutputFilter DEFLATE
SetEnvIfNoCase Request_URI \.(?:gif|jpe?g|png)$ no-gzip dont-vary
SetEnvIfNoCase Request_URI \.(?:exe|t?gz|zip|bz2|sit|rar)$ no-gzip dont-vary
SetEnvIfNoCase Request_URI \.pdf$ no-gzip dont-vary- Reinicamos el servicio
service apache2 restart- Configurar fecha
dpkg-reconfigure tzdata- Selecionamos America/Costa Rica
Instalación de youPHPTUBE
- Ingresamos en el directorio
cd /var/www/html/- Clonamos el proyecto de youPHPTUBE
git clone https://github.com/YouPHPTube/YouPHPTube.git
- Renombramos la carpeta
mv YouPHPTube/ videos.siua.ac.cr- Creamos la carpeta para almacenar los videos
mkdir /var/www/html/videos.siua.ac.cr/videos- Le damos permisos
chmod 777 -R videos.siua.ac.cr/- Ahora vamos a crear el virtual host para esto ingresamos a la carpeta
cd /etc/apache2/sites-available/- Creamos el archivo
nano videos.siua.ac.cr.conf- Contenido
<VirtualHost *:80>
    #************************************************************************
    #******************* DATOS DEL SITIO WEB ********************************
    #************************************************************************
    ServerName videos.siua.ac.cr
    ServerAlias *.videos.siua.ac.cr
    ErrorLog /var/log/apache2/videos_80.siua.ac.cr-error.log
    CustomLog /var/log/apache2/videos_80.siua.ac.cr-access.log common

    #************************************************************************
    #********************** DATOS DEL WEBMASTER *****************************
    #************************************************************************
    ServerAdmin interuniversitariadealajuela@gmail.com
    Header add Author "Unidad de Gestion e Innovacion Tecnologica"

    RewriteEngine on
    RewriteCond %{SERVER_NAME} =videos.siua.ac.cr [OR]
    RewriteCond %{SERVER_NAME} =*.videos.siua.ac.cr
    RewriteRule ^ https://%{SERVER_NAME}%{REQUEST_URI} [END,NE,R=permanent]
</VirtualHost>
<VirtualHost *:443>
    #************************************************************************
    #******************* DATOS DEL SITIO WEB ********************************
    #************************************************************************
    ServerName videos.siua.ac.cr
    ServerAlias *.videos.siua.ac.cr
    ErrorLog /var/log/apache2/videos_443.siua.ac.cr-error.log
    CustomLog /var/log/apache2/videos_443.siua.ac.cr-access.log common

    #************************************************************************
    #********************** DATOS DEL WEBMASTER *****************************
    #************************************************************************
    ServerAdmin interuniversitariadealajuela@gmail.com
    Header add Author "Unidad de Gestion e Innovacion Tecnologica"

    #************************************************************************
    #********************** DATOS DEL CERTIFICADO ***************************
    #************************************************************************
    SSLEngine on
    SSLCertificateFile /etc/apache2/certificados/videos.siua.ac.cr/fullchain.pem
    SSLCertificateKeyFile /etc/apache2/certificados/videos.siua.ac.cr/privkey.pem

    DocumentRoot /var/www/html/videos.siua.ac.cr

    RewriteEngine On
    # redirect to configured domain or IP (updated by inithook)
RewriteCond %{HTTP_HOST} !^videos.siua.ac.cr$
    RewriteRule ^/(.*) https://videos.siua.ac.cr/$1 [R,L]

</VirtualHost>

<Directory /var/www/html/videos.siua.ac.cr/>
    Options +FollowSymLinks
    Options -Indexes
    AllowOverride All
    Require all granted
</Directory>
- Agregamos el VH
a2ensite videos.siua.ac.cr.conf- Reiniciamos
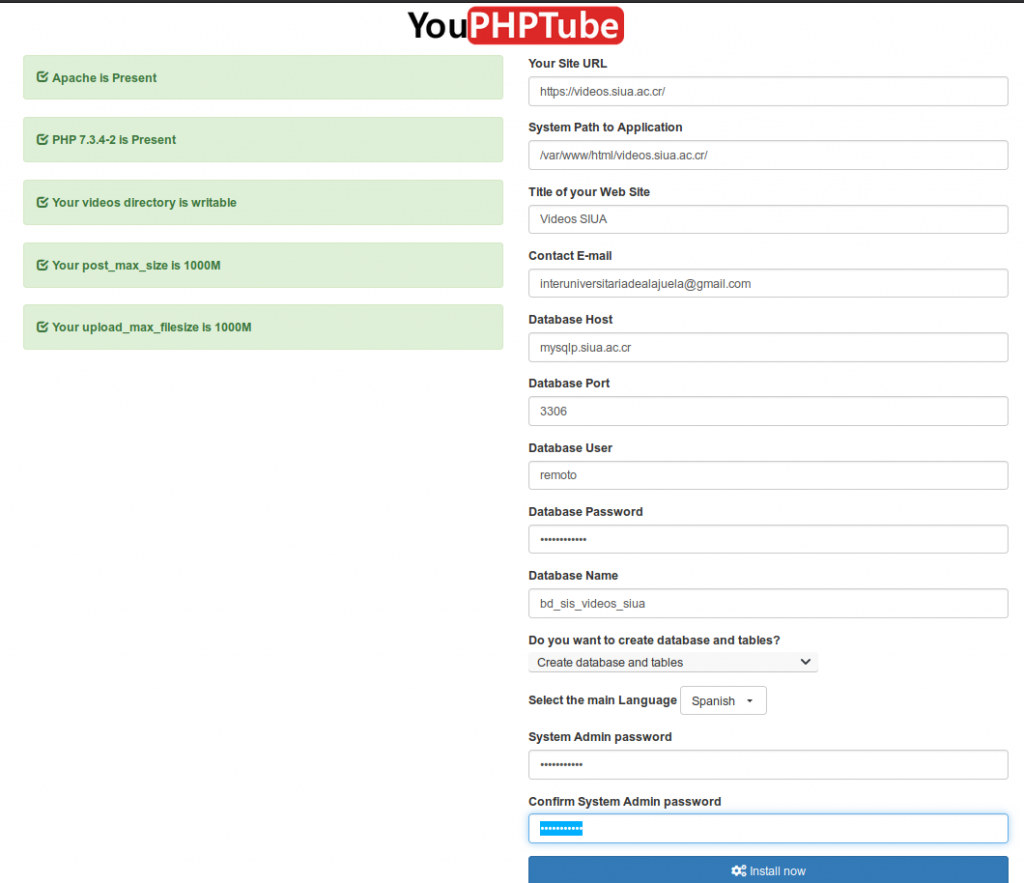
service apache2 reload- Ahora abrimos el navegador https://videos.siua.ac.cr
- Nos presenta la siguiente página donde nos indica que cumplimos con todos los requerimientos

- Nos indica que debemos eliminar el directorio de instalación

- Ejecutamos
rm -r install/