Instalación faveo ubuntu server 17.10 en maquina virtual proxmox 5
- Paso 1: crear un usuario de sistema (-r) «www-data»
useradd -r www-data - Paso 2: Creamos el grupo «www-data»
/usr/sbin/usermod -G www-data www-data;- Paso 3: obtenemos la llave de ngix y la guardamos (-O) en el archivo «/tmp/nginx-gpg.key»
wget -O /tmp/nginx-gpg.key http://nginx.org/keys/nginx_signing.key- Paso 4: añadimos la llave al sistema
apt-key add /tmp/nginx-gpg.key- Paso 5: agregamos al sources list el repositorio de ngix y de php
nano /etc/apt/sources.list- AGREGAR
deb http://nginx.org/packages/ubuntu/ zesty nginx- Paso 6: agregar el repositorio de PHP y apache
sudo add-apt-repository ppa:ondrej/apache2 sudo add-apt-repository ppa:ondrej/php- Paso 7: agregar repositorio de mariaDB
sudo apt-get install software-properties-common

sudo apt-key adv --recv-keys --keyserver hkp://keyserver.ubuntu.com:80 0xF1656F24C74CD1D8

sudo add-apt-repository 'deb [arch=amd64,i386] http://sfo1.mirrors.digitalocean.com/mariadb/repo/10.2/ubuntu artful main'- Paso 8: actualizamos el sistema
apt-get update && apt-get upgrade -y - Paso 9: instalamos programas
apt-get install curl software-properties-common git sl mlocate dos2unix bash-completion openssl mariadb-server nginx \
php5.6-soap php5.6-json php5.6-fpm php5.6-cli php5.6-gd php5.6-mbstring php5.6-common \
php5.6-mcrypt php5.6-xml php5.6-curl php5.6-imap php5.6-mysql php5.6-xmlrpc -y && updatedb;- Paso 10: detenemos los servicios
service nginx stop && \
service php5.6-fpm stop- Paso 11: respaldamos el archivo de configuración de ngix
mv /etc/nginx/nginx.conf /etc/nginx/nginx.conf.back;- Paso 12: abrimos el archivo de configuración de ngix
nano /etc/nginx/nginx.conf- AGERGAMOS
user www-data;
worker_processes 2;
pid /var/run/nginx.pid;

events {
 worker_connections 1024;
}

http {

 log_format main '$remote_addr - $remote_user [$time_local] "$request" '
 '$status $body_bytes_sent "$http_referer" '
 '"$http_user_agent" "$http_x_forwarded_for"';

 access_log /var/log/nginx/access.log main;
 error_log /var/log/nginx/error.log;
 include /etc/nginx/mime.types;
 default_type application/octet-stream;
 server_tokens off;
 gzip on;
 gzip_disable "msie[1-6]";
 gzip_vary on;
 gzip_proxied any;
 gzip_comp_level 6;
 gzip_buffers 16 8k;
 gzip_min_length 256;
 gzip_types text/plain text/css application/json application/x-javascript text/xml application/xml application/xml+rss text/javascript application/vnd.ms-fontobject application/x-font-ttf font/opentype image/svg+xml image/x-icon;
 ignore_invalid_headers on;
 max_ranges 1;
 read_ahead 512K;
 reset_timedout_connection on;
 keepalive_timeout 600;
 sendfile on;
 include /etc/nginx/conf.d/*.conf;

 proxy_read_timeout 3600;

}
- Paso 13: creamos el archivo de configuración para faveo-ngix
nano /etc/nginx/conf.d/faveo-helpdesk.conf- AGREGAMOS
# Faveo Helpdesk - Basic, Quick-Start NGINX Server Block
# 16.06.18 Author: Mathieu Aubin

upstream faveo_php {
 server unix://opt/faveo/run/faveo_php.socket;
}

server {
 listen 80;
 listen 127.0.0.1:80;
 # Edit the following line with the correct information.
 server_name %(SERVERNAME)s;
 error_log /opt/faveo/log/faveo_error_log;
 access_log /opt/faveo/log/faveo_access_log;
 root /opt/faveo/faveo-helpdesk/public;
 index index.php index.html index.htm;

 error_page 403 404 405 500 501 502 503 504 @error;

 try_files $uri $uri/ /index.php?$args;

 location @error {
 rewrite ^/(.*)$ /index.php?$1;
 }

 location ~ /\. {
 deny all;
 }

 location ~ /(artisan|composer.json|composer.lock|gulpfile.js|LICENSE|package.json|phpspec.yml|phpunit.xml|README.md|readme.txt|release-notes.txt|server.php) {
 deny all;
 }

 location ~ [^/]\.php(/|$) {
 fastcgi_split_path_info ^(.+?\.php)(/.*)$;
 if (!-f $document_root$fastcgi_script_name) {
 return 404;
 }
 include /etc/nginx/fastcgi_params;
 fastcgi_index index.php;
 fastcgi_param SCRIPT_FILENAME $document_root$fastcgi_script_name;
 fastcgi_pass faveo_php;
 fastcgi_read_timeout 240;
 }
}
- Paso 14: eliminamos el el archivo default de configuración de ngix
rm -rf /etc/nginx/conf.d/default.conf- Paso 15: creamos nuestro php-fpm pool
nano /etc/php/5.6/fpm/pool.d/faveo_php.conf- AGREGAR
; Faveo-Helpdesk CE PHP-FPM pool definition
; Author: Mathieu Aubin
[faveo_php]
user = www-data
group = www-data
listen = /opt/faveo/run/faveo_php.socket
listen.owner = www-data
listen.group = www-data
pm = dynamic
pm.max_children = 5
pm.start_servers = 2
pm.min_spare_servers = 1
pm.max_spare_servers = 3
chdir = /
- Paso 16: creamos los directorios para almacenar al proyecto (-p parent crea el directorio padre «faveo» si no existe )
mkdir -p /opt/faveo/log && mkdir -p /opt/faveo/run;- Paso 17: clonamos el proyecto
git clone https://github.com/ladybirdweb/faveo-helpdesk.git /opt/faveo/faveo-helpdesk- Paso 18: modificamos el dueño de la carpeta faveo
chown www-data:www-data /opt/faveo- Paso 19: actualizamos la base de datos de los archivos de sistema
updatedb- Paso 20: abrimos el archivo de configuración para modificar el nombre ser servidor
nano /etc/nginx/conf.d/faveo-helpdesk.conf- ORIGINAL
# Faveo Helpdesk - Basic, Quick-Start NGINX Server Block
# 16.06.18 Author: Mathieu Aubin

upstream faveo_php {
 server unix://opt/faveo/run/faveo_php.socket;
}

server {
 listen 80;
 listen 127.0.0.1:80;
 # Edit the following line with the correct information.
 server_name %(SERVERNAME)s;
 error_log /opt/faveo/log/faveo_error_log;
 access_log /opt/faveo/log/faveo_access_log;
 root /opt/faveo/faveo-helpdesk/public;
 index index.php index.html index.htm;

 error_page 403 404 405 500 501 502 503 504 @error;

 try_files $uri $uri/ /index.php?$args;

 location @error {
 rewrite ^/(.*)$ /index.php?$1;
 }

 location ~ /\. {
 deny all;
 }

 location ~ /(artisan|composer.json|composer.lock|gulpfile.js|LICENSE|package.json|phpspec.yml|phpunit.xml|README.md|readme.txt|release-notes.txt|server.php) {
 deny all;
 }

 location ~ [^/]\.php(/|$) {
 fastcgi_split_path_info ^(.+?\.php)(/.*)$;
 if (!-f $document_root$fastcgi_script_name) {
 return 404;
 }
 include /etc/nginx/fastcgi_params;
 fastcgi_index index.php;
 fastcgi_param SCRIPT_FILENAME $document_root$fastcgi_script_name;
 fastcgi_pass faveo_php;
 }
}
- Modificamos
server_name soporte.siua.ac.cr;
- Paso 21: configuramos MariaDB
- Iniciamos el servicio
service mysql start- Mandamos a configurar
mysql_secure_installationNOTE: RUNNING ALL PARTS OF THIS SCRIPT IS RECOMMENDED FOR ALL MariaDB
SERVERS IN PRODUCTION USE! PLEASE READ EACH STEP CAREFULLY!
In order to log into MariaDB to secure it, we'll need the current
password for the root user. If you've just installed MariaDB, and
you haven't set the root password yet, the password will be blank,
so you should just press enter here.
Enter current password for root (enter for none): HB3
OK, successfully used password, moving on...
Setting the root password ensures that nobody can log into the MariaDB
root user without the proper authorisation.
You already have a root password set, so you can safely answer 'n'.
Change the root password? [Y/n] n
... skipping.
By default, a MariaDB installation has an anonymous user, allowing anyone
to log into MariaDB without having to have a user account created for
them. This is intended only for testing, and to make the installation
go a bit smoother. You should remove them before moving into a
production environment.
Remove anonymous users? [Y/n] Y
... Success!
Normally, root should only be allowed to connect from 'localhost'. This
ensures that someone cannot guess at the root password from the network.
Disallow root login remotely? [Y/n] Y
... Success!
By default, MariaDB comes with a database named 'test' that anyone can
access. This is also intended only for testing, and should be removed
before moving into a production environment.
Remove test database and access to it? [Y/n] Y
- Dropping test database...
... Success!
- Removing privileges on test database...
... Success!
Reloading the privilege tables will ensure that all changes made so far
will take effect immediately.
Reload privilege tables now? [Y/n] Y
... Success!
Cleaning up...
All done! If you've completed all of the above steps, your MariaDB
installation should now be secure.
Thanks for using MariaDB!
- Paso 22: lo configuramos para permitir ingreso remoto
nano /etc/mysql/my.cnf- BUSCAMOS y comentamos
#bind-address = 127.0.0.1
- Ingresamos a MYSQL
mysql -u root -p mysql- Creamos el usuario remoto
GRANT ALL PRIVILEGES ON *.* TO 'remoto'@'%' IDENTIFIED BY 'RB0' WITH GRANT OPTION;- Actualizamos privilegios
FLUSH PRIVILEGES;- Reiniciamos mysql
service mysql restart
- Paso 23: creamos la base de datos, para esto creamos un script
nano /tmp/faveo-createdb.sh- AGREGAMOS, modificando los datos, esto crea un archivo «/tmp/faveo-blank.sql»
#!/bin/sh

# Edit the values AFTER the EQUAL "=" sign to your desired database for Faveo-Helpdesk
# Database name, user and password must all be different from one another...
# Also enter your MYSQL root password.
# The values that are currently entered are for demonstration only, you have to enter the right values for YOU.
# No spaces BEFORE or AFTER, be smart.

DB_NAME=faveo
DB_USER=remoto
DB_PASS=RB0
MYSQL_ROOT_PASS=HB3

########################################################################
########################################################################
######### DO NOT TOUCH THE FOLLOWING LINES #############################
########################################################################
########################################################################
printf "CREATE DATABASE %s;" $DB_NAME > /tmp/faveo-blank.sql;
printf "GRANT ALL PRIVILEGES ON %s.* TO '%s'@'localhost' IDENTIFIED BY '%s';" $DB_NAME $DB_USER $DB_PASS >> /tmp/faveo-blank.sql;
printf "FLUSH PRIVILEGES;" >> /tmp/faveo-blank.sql;

/usr/bin/mysql -u root -p"$MYSQL_ROOT_PASS" < /tmp/faveo-blank.sql;
echo "La base de datos de faveo a sido creada..."
- Paso 24: le damos permisos de ejecución
chmod +x /tmp/faveo-createdb.sh- Paso 25: convertimos el archivo en formato Unix
dos2unix /tmp/faveo-createdb.sh- Paso 26: ejecutamos el archivo
sh /tmp/faveo-createdb.sh- Paso 27: podemos comprobar que la base de datos se creo correctamente ingresando a mariadb
mysql -u root -p- Listar las bases de datos
show databases;
- RESULTADO
+--------------------+
| Database |
+--------------------+
| faveo |
| information_schema |
| mysql |
| performance_schema |
+--------------------+
4 rows in set (0.00 sec)
- Salimos
quit- Paso 28: iniciar los servicios
service php5.6-fpm start

service nginx start

service mysql start
- Paso 29: instalamos composer de forma global
curl -sS https://getcomposer.org/installer | php -- --install-dir=/usr/local/bin --filename=composer- Paso 30: creamos un cron
crontab -l ;\
echo -e "# Faveo-Helpdesk Cronjobs\n# This gets email tickets every 5 minutes, change to suit your needs\n\
*/5 * * * * /usr/bin/curl http://127.0.0.1/readmails\n\
# This runs the notification everyday at 23:55, change for another time if you want.\n\
55 23 * * * /usr/bin/curl http://127.0.0.1/notification" | crontab - && sleep 1;
- Paso 31: comprobamos que los servicios estén corriendo
service nginx status | grep 'Active:' | grep --color=auto 'dead\|failed\|running'service mysql status | grep 'Active:' | grep --color=auto 'dead\|failed\|running'service php5.6-fpm status | grep 'Active:' | grep --color=auto 'dead\|failed\|running'- RESULTADO
Active: active (running) since Thu 2017-12-07 10:39:35 CST; 16min ago
- Paso 32: comprobamos que tenemos todos los requisitos para esto creamos una carpeta
mkdir /opt/faveo/faveo_probe- Le damos permisos
chmod 777 -R /opt/faveo/faveo_probe- Le insertamos los siguientes archivos
- Les damos permisos
chmod 777 -R /opt/faveo/faveo_probe- Paso 33: instalamos dependecias
apt-get install curl php5.6-cli php5.6-mbstring git unzip- Paso 34: ingresamos a la carpeta del proyecto
cd /opt/faveo/faveo-helpdesk/- Paso 35: instalamos composer
php -r "copy('https://getcomposer.org/installer', 'composer-setup.php');"php -r "if (hash_file('SHA384', 'composer-setup.php') === '544e09ee996cdf60ece3804abc52599c22b1f40f4323403c44d44fdfdd586475ca9813a858088ffbc1f233e9b180f061') { echo 'Installer verified'; } else { echo 'Installer corrupt'; unlink('composer-setup.php'); } echo PHP_EOL;"php composer-setup.phpphp -r "unlink('composer-setup.php');"- Podemos comprobar que esta instalado
php artisan --version- RESULTADO
PHP Notice: Use of undefined constant MCRYPT_RIJNDAEL_128 - assumed 'MCRYPT_RIJNDAEL_128' in /opt/faveo/faveo-helpdesk/config/app.php on line 101
Laravel Framework version 5.2.45
- Paso 36: damos permisos de escritura a estas carpetas
chmod 777 -R /opt/faveo/faveo-helpdesk/storage/
chmod 777 -R /opt/faveo/faveo-helpdesk/vendor/
- Paso 37: ingresamos al archivo:
nano /opt/faveo/faveo-helpdesk/config/database.php- Y modificamos el mysql
'mysql' => [
 'driver' => 'mysql',
 'host' => env('DB_HOST', 'localhost'),
 'database' => env('DB_DATABASE','faveo'),
 'username' => env('DB_USERNAME','remoto'),
 'password' => env('DB_PASSWORD','RB0'),
 'charset' => 'utf8',
 'collation' => 'utf8_unicode_ci',
 'port' => env('DB_PORT', '3306'),
 'prefix' => '',
 'strict' => false,
 ],
- Paso 38: ya podemos acceder al sitio http://faveo.siua.ac.cr

- Paso 38: Aceptamos la licencia

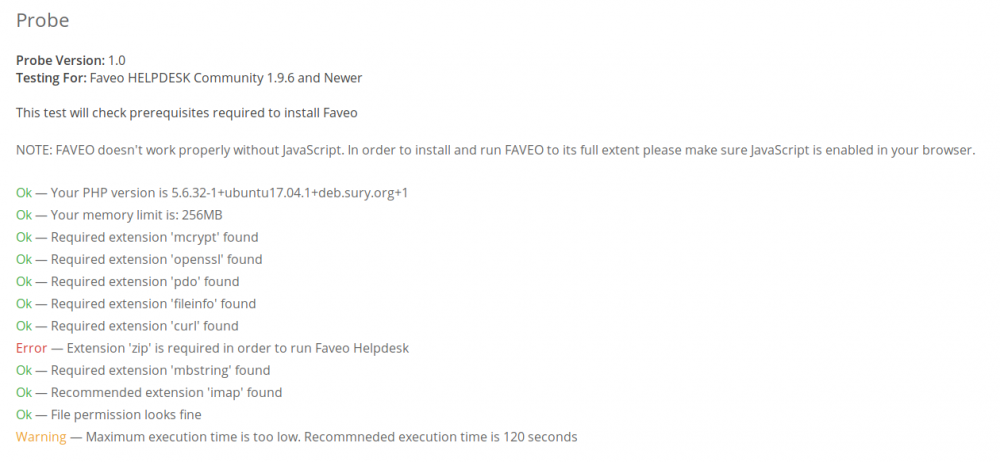
- Paso 39: ingresa al probe de faveo y nos indica 2 errores:

- Paso 40: instalamos php5.6-zip
apt install php5.6-zip
- Paso 41: reiniciamos el servidor
service nginx restart- Paso 42: modificamos el tiempo maximo de ejcución
nano /etc/php/5.6/fpm/php.ini - BUSCAMOS y MODIFICAMOS
max_execution_time = 30
X
max_execution_time = 120- Abrimos el archivo
nano /etc/php/5.6/fpm/pool.d/www.conf- BUSCAMOS, DESCOMENTAMOS y MODIFICAMOS
;request_terminate_timeout = 30
X
request_terminate_timeout = 300
- Paso 43: reiniciamos servicios
service nginx restart

service php5.6-fpm restart- Volvemos a modificar el dueño de la carpeta
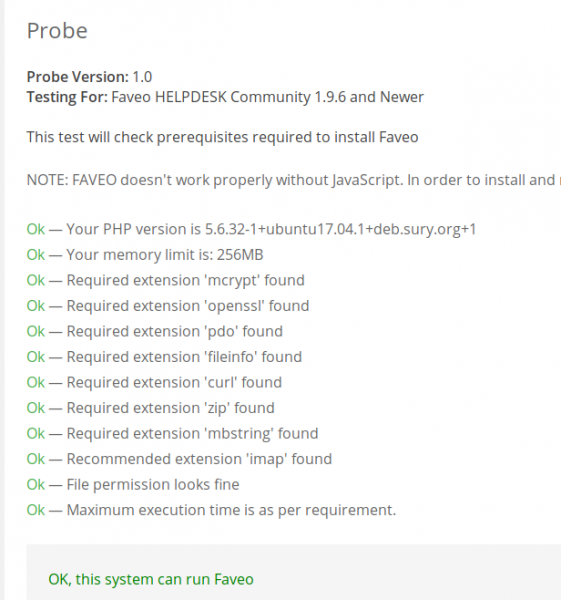
sudo chown www-data:www-data /opt/faveo -R- Paso 44: recargamos la pagina de comprobación

- Paso 45: damos clic en el botón de «Continuar»

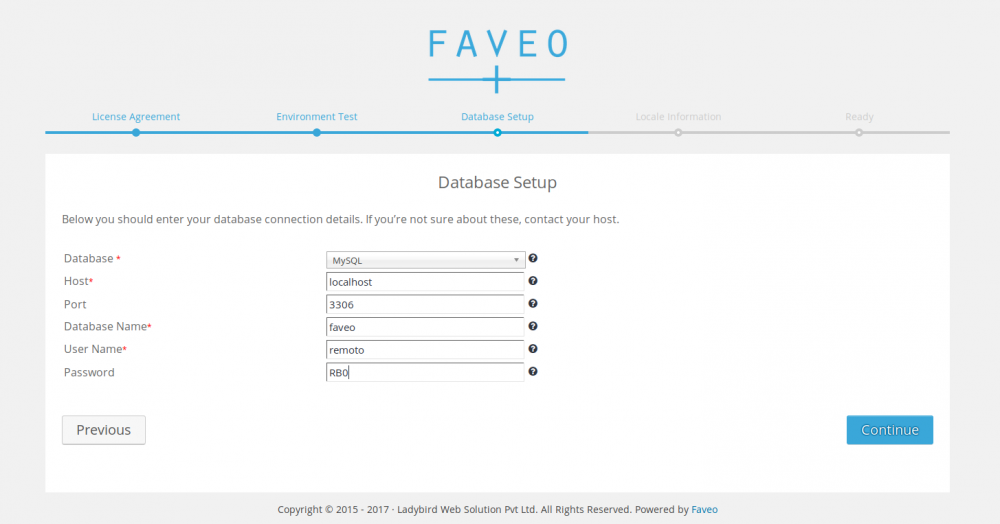
- Paso 46: digitamos los datos de conexión a la base de datos

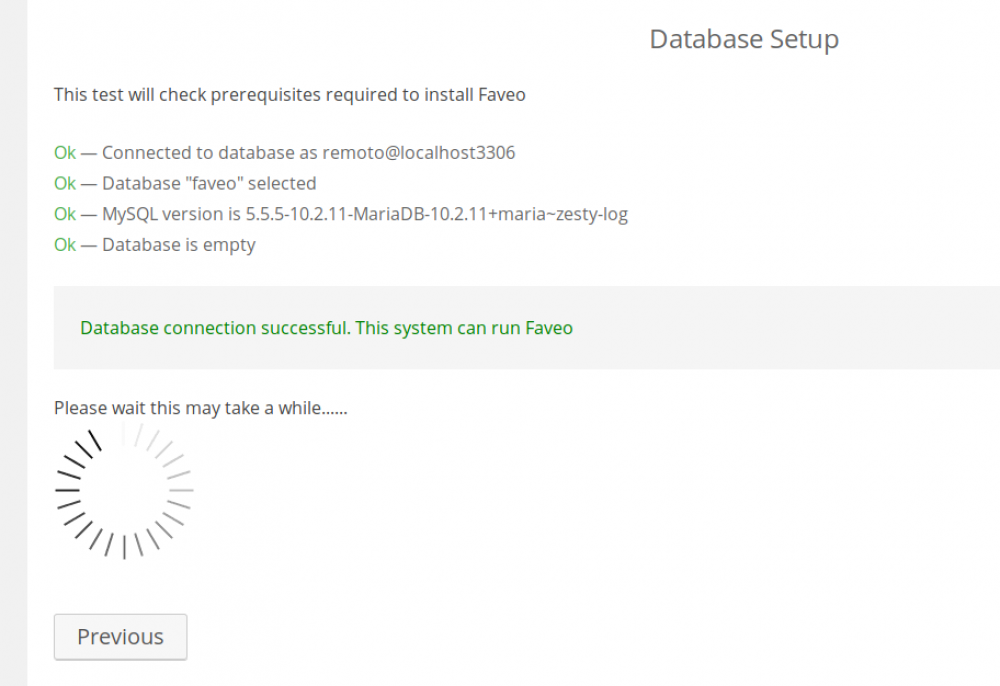
- Inicia el proceso de creación de la base de datos

- Paso 47: Completamos el formulario
- Datos del administrador

- Datos del usuario administrador

- Datos de locación

- Si queremos datos de prueba

- Listo tenemos faveo instalado
