SISTEMA
- Actualizamos el sistema
sudo apt-get update && sudo apt-get upgrade && sudo apt-get dist-upgrade && sudo apt-get check && sudo apt-get install -fy && sudo apt-get autoremove && sudo apt-get autoclean && sudo apt-get clean -ysudo apt-get install linux-headers-`uname -r`
sudo apt install apt-transport-https- Traducir a español
sudo apt-get install firefox-locale-es language-pack-es language-pack-es-base aspell-es myspell-es -y- Habilitamos orígenes de software Socios canonical
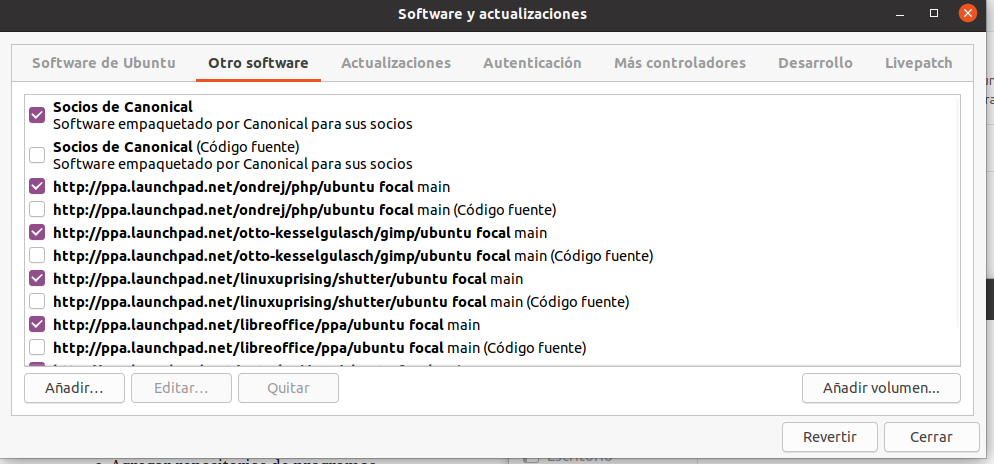
- Actualizamos
sudo apt-get update && sudo apt-get upgrade && sudo apt-get dist-upgrade && sudo apt-get check && sudo apt-get install -fy && sudo apt-get autoremove && sudo apt-get autoclean && sudo apt-get clean -yREPOSITORIOS
- Agregar repositorios de programas
sudo add-apt-repository ppa:ondrej/php -y
sudo add-apt-repository ppa:libreoffice/ppa -y
sudo add-apt-repository ppa:otto-kesselgulasch/gimp -y
sudo add-apt-repository ppa:peterlevi/ppa -y
sudo add-apt-repository ppa:linuxuprising/shutter -y- Actualizamos
sudo apt-get update && sudo apt-get upgrade && sudo apt-get dist-upgrade && sudo apt-get check && sudo apt-get install -fy && sudo apt-get autoremove && sudo apt-get autoclean && sudo apt-get clean -yPROGRAMAS
- Instalamos
sudo apt-get install gnome-shell-extensions apt-transport-https python3-minimal arj audacious apache2 audacity acetoneiso alien curl codeblocks chromium-browser cheese chromium-codecs-ffmpeg-extra deluge devede easytag fonts-noto filezilla filezilla-common grub-customizer gstreamer1.0-plugins-base gscan2pdf hardinfo inkscape lzip language-pack-gnome-es language-pack-es language-pack-kde-es lmms mixxx mysql-server mysql-client mysql-testsuite minicom openshot openjdk-8-jdk openssh-client openssh-server p7zip p7zip-full p7zip-rar php php-mysql php-gd php-ldap php-odbc php-pgsql php-curl php-json php-sqlite3 php-xml php-mbstring libapache2-mod-php firefox putty ppa-purge rar rhythmbox synaptic smplayer samba subdownloader soundconverter ttf-dejavu ttf-bitstream-vera testdisk ttf-mscorefonts-installer ubuntu-restricted-extras unrar unace unzip unity-tweak-tool variety zip zlib1g unity-tweak-tool libavcodec-extra libdvd-pkg sharutils uudeview cabextract file-roller ffmpeg icedax libdvd-pkg id3tool lame libxine2-ffmpeg nautilus-script-audio-convert libmad0 mpg321 gstreamer1.0-libav vlc unity-tweak-tool exfat-fuse exfat-utils hfsplus hfsutils ntfs-3g libavcodec-extra libappindicator1 aptitude gdebi lm-sensors hddtemp printer-driver-all gnome-tweak-tool gufw chrome-gnome-shell libreoffice git k3b gparted gnome-tweaks chrome-gnome-shell shutter make build-essential net-tools minitube glabels terminator curl nano wget libreoffice libreoffice-l10n-es libreoffice-templates -y- Para soporte de cualquier tipo de partición
sudo apt-get install exfat-fuse exfat-utils hfsplus hfsutils ntfs-3g- Instalar codecs
sudo apt-get install ubuntu-restricted-extras libavcodec-extra libdvdcss2- Compatibilidad con smartphone
sudo apt-get install mtp-tools ipheth-utils ideviceinstaller ifuse- Gestores de paquetes
sudo apt-get install gdebi gdebi-core synaptic- A este punto hacemos un upgrade
sudo apt update
sudo apt upgrade- Si da el error
/usr/src/libdvd-pkg/libdvdcss_1.4.2.orig.tar.bz2: La suma coincide
libdvd-pkg: `apt-get check` failed, you may have broken packages. Aborting.- Ejecutamos
sudo dpkg-reconfigure libdvd-pkg- Conpiladores y extras
sudo apt-get install build-essential
sudo apt-get install linux-headers-`uname -r`- Si es una portatil instalar sensores
sudo apt-get install lm-sensors hddtemp- También necesitaremos un gestor de corriente para alargar la batería y evitar calentamientos:
sudo apt install tlp tlp-rdw -y
sudo tlp start- Si vamos a trabajar con impresoras vamos a necesitar los drivers para ellas.
sudo apt-get install printer-driver-allMYSQL Y WORKBENCH
- Instalar: descargar
sudo gedit /etc/mysql/mysql.conf.d/mysqld.cnf- Buscar y comentar
bind-address		= 127.0.0.1
X
#bind-address = 127.0.0.1- Reiniciar MYSQL
sudo service mysql restart- Mandamos a configurar el mysql como root
mysql_secure_installation- Si da el error
... Failed! Error: SET PASSWORD has no significance for user 'root'@'localhost' as the authentication method used doesn't store authentication data in the MySQL server. Please consider using ALTER USER instead if you want to change authentication parameters.- Ejecutamos
sudo mysql- Luego
ALTER USER 'root'@'localhost' IDENTIFIED WITH mysql_native_password by 'LM0';- Para poder ingresar con el usario root en workbench
sudo mysql -u root- Volvemos a ejecutar
mysql_secure_installation- Resultado
Securing the MySQL server deployment.

Enter password for user root: LM0

VALIDATE PASSWORD COMPONENT can be used to test passwords
and improve security. It checks the strength of password
and allows the users to set only those passwords which are
secure enough. Would you like to setup VALIDATE PASSWORD component?

Press y|Y for Yes, any other key for No: No
Using existing password for root.
Change the password for root ? ((Press y|Y for Yes, any other key for No) : No

 ... skipping.
By default, a MySQL installation has an anonymous user,
allowing anyone to log into MySQL without having to have
a user account created for them. This is intended only for
testing, and to make the installation go a bit smoother.
You should remove them before moving into a production
environment.

Remove anonymous users? (Press y|Y for Yes, any other key for No) : y
Success.


Normally, root should only be allowed to connect from
'localhost'. This ensures that someone cannot guess at
the root password from the network.

Disallow root login remotely? (Press y|Y for Yes, any other key for No) : y
Success.

By default, MySQL comes with a database named 'test' that
anyone can access. This is also intended only for testing,
and should be removed before moving into a production
environment.


Remove test database and access to it? (Press y|Y for Yes, any other key for No) : y
 - Dropping test database...
Success.

 - Removing privileges on test database...
Success.

Reloading the privilege tables will ensure that all changes
made so far will take effect immediately.

Reload privilege tables now? (Press y|Y for Yes, any other key for No) : y
Success.

All done!
- Modificamos para que root sea % en vez de localhost
sudo mysql -u root -p
UPDATE mysql.user SET Host='%' WHERE Host='localhost' AND User='root';
UPDATE mysql.db SET Host='%' WHERE Host='localhost' AND User='root';
FLUSH PRIVILEGES;- Crear usuario tauro
CREATE USER 'tauro'@'%' IDENTIFIED BY 'AM1';- Le damos los permisos
ALTER USER 'tauro'@'%' IDENTIFIED WITH mysql_native_password BY '$_Ara_MSQL_1_$.';
GRANT ALL PRIVILEGES ON *.* TO 'tauro'@'%';
FLUSH PRIVILEGES;- Salimos de MYSQL
exitSUBLIME-TEXT
- Agregamos PPA
wget -qO - https://download.sublimetext.com/sublimehq-pub.gpg | sudo apt-key add -
echo "deb https://download.sublimetext.com/ apt/stable/" | sudo tee /etc/apt/sources.list.d/sublime-text.list
sudo apt update && sudo apt install sublime-text- Ingresar a sublime text 3->Tools->Install Package Control
- Luego ingresar a Preferences->Package Control->Digitar Install Package instalar:
- AdvancedNewFile: permite crear nuevos archivos digitando toda la ruta
- Alignment: permite alinear elementos
- AutoSemiColon: corrige el punto y coma si lo colocamos en un lugar erroreneo
- AutoFileName: permite autocomepletar nombres de carpetas y archivos
- ApacheConf: establece un estilo de color para los archivos del apache conf
- BracketHighlighter: marca el inicio o fin de unas llaves
- Color Highlighter: le coloca el color a los elementos
- DocBlockr: para mejorar la documentación
- EMMET: autocomplete
- HTML Nest Comments: permite comentar HTML
- HTML5: autocompleta html5
- sublimeCodeIntel: autocomplete JavaScript, SCSS, Python, HTML, Ruby, Python3, XML, Sass, HTML5, Perl, CSS, Twig, Less, Node.js, TemplateToolkit and PHP
- sublimeLinter: muestra errores de sintaxis
- HTMLAttributes
- HTML Minifier
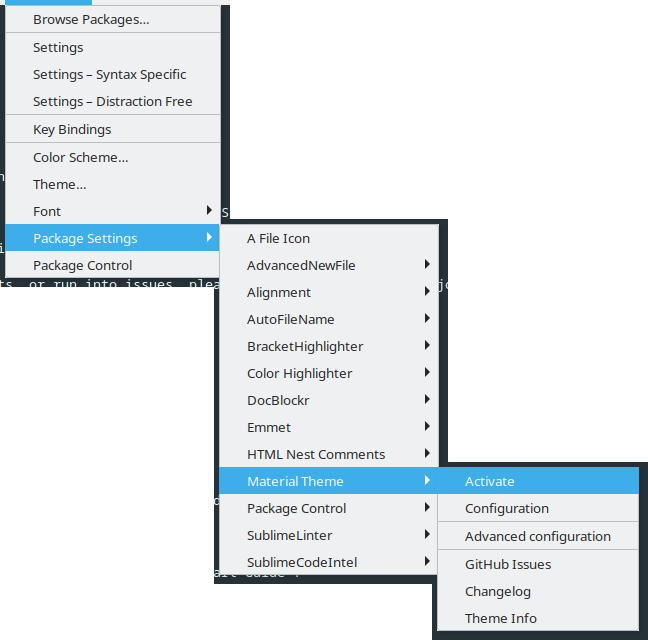
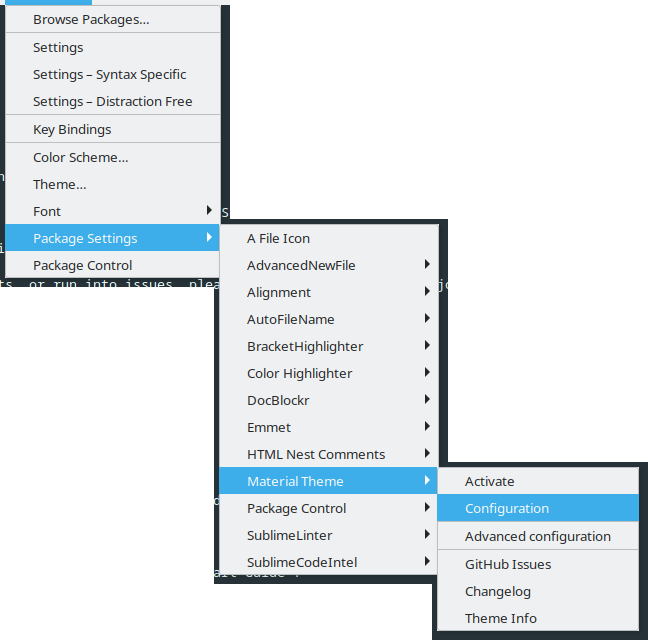
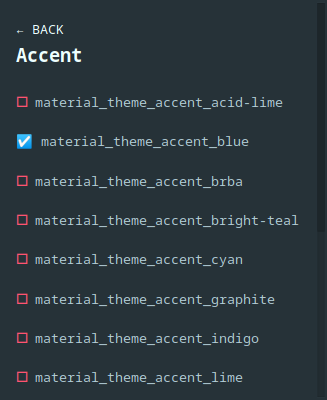
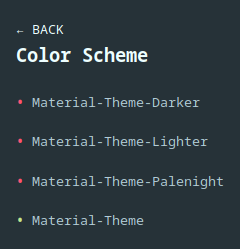
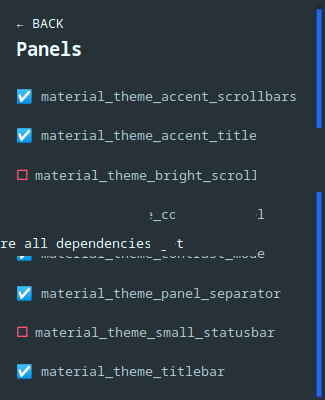
- Material Theme
Aplicar las siguientes configuraciones


Chrome
- Abrimos
sudo nano /etc/apt/sources.list.d/google-chrome.list- Agregamos
deb [arch=amd64] http://dl.google.com/linux/chrome/deb/ stable main- Agregamos llave publica
wget https://dl.google.com/linux/linux_signing_key.pub
sudo apt-key add linux_signing_key.pub- Instalamos
sudo apt update
sudo apt install google-chrome-stable
GIT
- Configuramos
git config --global user.name "Gustavo Matamoros González"
git config --global user.email "gustavo.matamoros@gmail.com"
git config --global core.editor gedit
git config --global color.ui true
git config --global credential.helper store
git config --global push.followTags true

git config --global alias.superlog "log --graph --abbrev-commit --decorate --date=relative --format=format:'%C(bold blue)%h%C(reset) - %C(bold green)(%ar)%C(reset) %C(white)%s%C(reset) %C(dim white)- %an%C(reset)%C(bold yellow)%d%C(reset)' --all"
BASH-IT
- Como usuario común del sistema no como root
cd /home/tavo
cd /home/ugit
cd /home/estudiante
git clone --depth=1 https://github.com/Bash-it/bash-it
cd bash-it
./install.sh- Plugins
bash-it enable alias apt
bash-it enable completion ssh

bash-it update
bash-it reload
Node JS
- Instalación de node JS
sudo apt-get install gcc g++ make
curl -fsSL https://deb.nodesource.com/setup_18.x | sudo -E bash -
o
curl -sL https://deb.nodesource.com/setup_current.x | sudo -E bash -
sudo apt-get install -y nodejs- Verificamos la versión de node y npm
node --version
npm --version
Angular CLI
- Para la instalación de Angular de forma sencilla instalamos el cliente
sudo su
npm install -g @angular/cli- Comprobamos la versión
- NOTA: si ejecutamos este comando en cualquier directorio de nuestra computadora (que no sea dentro de un proyecto) nos ya la información de la Angula CLI que tenemos instalada de manera global en nuestra máquina pero si lo ejecutamos dentro del directorio de un proyecto angular nos da la información del proyecto
ng v- Nos pregunta
? Would you like to enable autocompletion? This will set up your terminal so
pressing TAB while typing Angular CLI commands will show possible options and
autocomplete arguments. (Enabling autocompletion will modify configuration files
 in your home directory.) Yes
Appended `source <(ng completion script)` to `/root/.bashrc`. Restart your terminal or run the following to autocomplete `ng` commands:

    source <(ng completion script)
? Would you like to share anonymous usage data about this project with the
Angular Team at
Google under Google’s Privacy Policy at https://policies.google.com/privacy. For
 more
details and how to change this setting, see https://angular.io/analytics. No
Global setting: disabled
Local setting: No local workspace configuration file.
Effective status: disabled

     _                      _                 ____ _     ___
    / \   _ __   __ _ _   _| | __ _ _ __     / ___| |   |_ _|
   / △ \ | '_ \ / _` | | | | |/ _` | '__|   | |   | |    | |
  / ___ \| | | | (_| | |_| | | (_| | |      | |___| |___ | |
 /_/   \_\_| |_|\__, |\__,_|_|\__,_|_|       \____|_____|___|
                |___/


Angular CLI: 14.1.3
Node: 18.8.0 (Unsupported)
Package Manager: npm 8.18.0
OS: linux x64

Angular:
...

Package                      Version
------------------------------------------------------
@angular-devkit/architect    0.1401.3 (cli-only)
@angular-devkit/core         14.1.3 (cli-only)
@angular-devkit/schematics   14.1.3 (cli-only)
@schematics/angular          14.1.3 (cli-only)

Warning: The current version of Node (18.8.0) is not supported by Angular.
KVM
- Comprobamos que el equipo soporta virtualización
grep -E -c "vmx|svm" /proc/cpuinfo- Verificamos que el equipo soporte virtualización con KVM
// Instalar
sudo apt install -y cpu-checker

//Ejecutar
kvm-ok

//Resultado
INFO: /dev/kvm exists
KVM acceleration can be used- Instalamos
sudo apt install -y qemu qemu-kvm libvirt-daemon bridge-utils virt-manager virtinst libosinfo-bin- Iniciamos y verificamos el servicio libvirtd
sudo systemctl status libvirtd.service- Iniciamos
sudo systemctl enable libvirtd --now- Agregamos el usuario al grupo
sudo usermod -aG libvirt $USER
sudo usermod -aG kvm $USER
FIREFOX DEVELOPERcd
- Descargamos desde: descargar
- Ingresamos a descargas
cd ~/Descargas/- Descomprimimos
tar -xvf firefox-*.tar.bz2 - Movemos a opt
sudo -s mv firefox /opt- Hacemos un enlace
sudo ln -s /opt/firefox/firefox /usr/local/bin/firefox- Creamos una acceso directo
sudo touch /usr/share/applications/firefox-developer.desktop- Abrimos el archivo
sudo nano /usr/share/applications/firefox-developer.desktop- Agregamos
[Desktop Entry]
Name=Firefox Developer
GenericName=Firefox Developer Edition
Exec=/usr/local/bin/firefox
Terminal=false
Icon=/opt/firefox/browser/chrome/icons/default/default48.png
Type=Application
Categories=Application;Network;X-Developer;
Comment=Firefox Developer Edition Web Browser- Damos permisos
sudo chmod +x /usr/share/applications/firefox-developer.desktop- Instalamos el idioma español
- https://addons.mozilla.org/en-US/firefox/addon/spanish-mexico-dictionary/
- https://addons.mozilla.org/es/firefox/addon/spanish-mexico-language-pack/
- https://addons.mozilla.org/es/firefox/addon/diccionario-espa%C3%B1ol-m%C3%A9xico/
- Ingresamos a
about:config- Buscamos
intl.locale.requested- Seleccionamos string y le ponemos
es_MX- Instalamos complementos (EN ambos Firefox común y developer)
https://addons.mozilla.org/en-US/firefox/addon/video-downloadhelper
https://addons.mozilla.org/en-US/firefox/addon/font-inspect
https://addons.mozilla.org/en-US/firefox/addon/wappalyzer
https://addons.mozilla.org/en-US/firefox/addon/html-validator
https://addons.mozilla.org/en-US/firefox/addon/mjsonviewer
https://addons.mozilla.org/en-US/firefox/addon/colorzilla
https://addons.mozilla.org/en-US/firefox/addon/gnome-shell-integration/
- Agregamos solo en uno
https://extensions.gnome.org/extension/7/removable-drive-menu/
https://extensions.gnome.org/extension/6/applications-menu/
https://extensions.gnome.org/extension/1218/printers/
https://extensions.gnome.org/extension/8/places-status-indicator/
https://extensions.gnome.org/extension/905/refresh-wifi-connections/
https://extensions.gnome.org/extension/1217/appfolders-manager/
https://extensions.gnome.org/extension/97/coverflow-alt-tab/
https://extensions.gnome.org/extension/442/drop-down-terminal/
https://extensions.gnome.org/extension/104/netspeed/
https://extensions.gnome.org/extension/1319/gsconnect/
https://extensions.gnome.org/extension/906/sound-output-device-chooser/
WPS
- Instalamos WPS
- descargar: descargar
Onlyoffice
- Descargar: aquí
VISUAL CODE
- Descargamos descargar
- Instalamos los plugins
- Angular Snippets
- Angular Essentials
- Angular Language Service: nos permite detectar errores en el template
- TSLint (Microsoft): para sintaxis Typescript
Instalación de .NET donet
- Instalamos
cd /tmp
wget https://packages.microsoft.com/config/ubuntu/21.04/packages-microsoft-prod.deb -O packages-microsoft-prod.deb
sudo dpkg -i packages-microsoft-prod.deb- Instalación SDK
sudo apt-get update; \
  sudo apt-get install -y apt-transport-https && \
  sudo apt-get update && \
sudo apt-get install -y dotnet-sdk-5.0- Instalamos la extensiones:
- C#

- C# Extensions
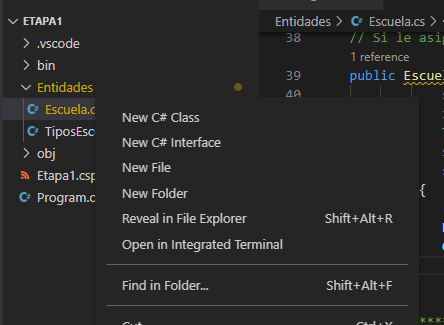
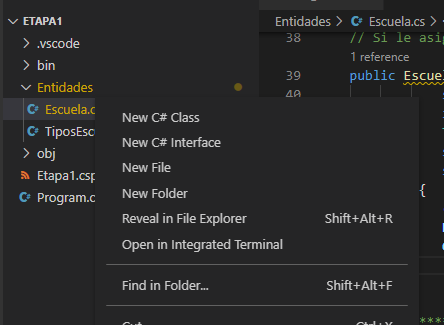
- Esta extensión nos permite crear clases desde el menú
Instalar draw.io
- Descargar: aquí
OPERA
- Instalamos opera: descargar
VIRTUALBOX
- Instalamos virtualBox: descargar
- Añadir el usuario al grupo vboxusers para corregir problema de USB
sudo adduser nombre_usuario vboxusers
sudo adduser tavo vboxusers
sudo adduser ugit vboxusers
sudo adduser estudiante vboxusers
NEXCLOUD
sudo add-apt-repository ppa:nextcloud-devs/client -y
sudo apt-get update
sudo apt install nextcloud-client -y
APACHE Y PHP
- Configuramos apache
- Le damos permisos de escritura a la carpeta «html»
sudo chmod 777 -R /var/www/html- Establecer codificación UTF-8
sudo gedit /etc/apache2/conf-enabled/charset.conf- Descomentar la línea:
#AddDefaultCharset UTF-8
X
AddDefaultCharset UTF-8- Reiniciar apache
sudo service apache2 restart- Creamos 2 carpetas en el escritorio
sudo mkdir /home/nombre_usuario/Escritorio/session
sudo mkdir /home/nombre_usuario/Escritorio/errores

sudo mkdir /home/tavo/Escritorio/session
sudo mkdir /home/tavo/Escritorio/errores

sudo mkdir /home/ugit/Escritorio/session
sudo mkdir /home/ugit/Escritorio/errores

sudo mkdir /home/estudiante/Escritorio/session
sudo mkdir /home/estudiante/Escritorio/errores- Le damos permisos a las carpetas
sudo chmod 777 /home/nombre_usuario/Escritorio/session
sudo chmod 777 /home/nombre_usuario/Escritorio/errores

sudo chmod 777 /home/tavo/Escritorio/session
sudo chmod 777 /home/tavo/Escritorio/errores

sudo chmod 777 /home/ugit/Escritorio/session
sudo chmod 777 /home/ugit/Escritorio/errores

sudo chmod 777 /home/estudiante/Escritorio/session
sudo chmod 777 /home/estudiante/Escritorio/errores- Downgrade php 8 to 7.4
sudo add-apt-repository ppa:ondrej/php
sudo apt-get update
sudo apt-get install php7.4
sudo apt-get install php7.4-cli php7.4-common php7.4-json php7.4-opcache php7.4-mysql php7.4-mbstring  php7.4-zip php7.4-fpm php7.4-intl php7.4-simplexml libapache2-mod-php  php7.4-xml php7.4-xmlrpc php7.4-curl php7.4-gd php7.4-imagick php7.4-cli php7.4-dev php7.4-imap php7.4-mbstring php7.4-opcache php7.4-soap php7.4-zip php7.4-intl


sudo a2dismod php8.1

sudo a2enmod php7.4

sudo service apache2 restart

sudo update-alternatives --set php /usr/bin/php7.4
sudo update-alternatives --set phar /usr/bin/phar7.4
sudo update-alternatives --set phar.phar /usr/bin/phar.phar7.4
sudo update-alternatives --set phpize /usr/bin/phpize7.4
sudo update-alternatives --set php-config /usr/bin/php-config7.4

php -v- Abrimos el archivo de configuración
sudo gedit /etc/php/7.4/apache2/php.ini
- Modificamos
max_execution_time = 30
X
max_execution_time = 60
-----------------------------------------------------------------------
;error_log = syslog
X
error_log = /home/tavo/Escritorio/errores/errores.txt
-----------------------------------------------------------------------
post_max_size = 8M
X
post_max_size = 30M
-----------------------------------------------------------------------
upload_max_filesize = 2M
X
upload_max_filesize = 25M- Reiniciamos apache
sudo service apache2 restart - Agregamos el usuario «tavo» al grupo www-data
sudo chgrp -R www-data /var/www/html
sudo chmod -R g+w /var/www/html
sudo find /var/www/html -type d -exec chmod 2775 {} \;
sudo find /var/www/html -type f -exec chmod ug+rw {} \;


sudo usermod -a -G www-data tavo
sudo usermod -a -G www-data ugit
sudo usermod -a -G www-data estudiante

sudo chmod g+s /var/www/html/
sudo setfacl -d -m g::rwx /var/www/html/
sudo chmod 777 -R /var/www/html- Instalamos
sudo apt install ca-certificates apt-transport-https acl git- Verificar versión de php
php -v- Módulos
sudo a2enmod ssl
sudo a2enmod headers
sudo a2enmod rewrite
sudo systemctl restart apache2
ACTIVAR COLORES TERMINAL
- Ejecutamos
cp /etc/skel/.bashrc ~/.bashrc
nano ~/.bashrc- Modificamos
#force_color_prompt=yes
X
force_color_prompt=yes- Reiniciamos
source ~/.bashrcTEMAS
- Creamos dentro de «/home/nombre_usuario/» una carpeta oculta de nombre «.themes»
- Y otra «.icons»
mkdir /home/tavo/.themes
mkdir /home/ugit/.themes
mkdir /home/estudiantes/.themes

mkdir /home/tavo/.icons
mkdir /home/ugit/.icons
mkdir /home/estudiantes/.icons- Descargamos los siguientes temas: descargar y los colocamos en la carpeta «.themes»
- Descargamos los siguientes iconos descargar y los colocamos en la carpeta «.icons»